How some goats, a pool, and a stranger named Hope helped me find my way
Note: I’m a bit rusty with WordPress, blogging, and editing, so please excuse the clunkiness of this post. The Flaming Pot Holder has been nonexistent since February 2013. Even in 2013, I was writing less and working more. Figured I could be paid to write and edit or I could write and cook for fun. Somehow, I wasn’t able to balance the two, and I chose work. Then I became ill, not the garden-variety sinus stuff I’d had in the past. But scary sick.
Condensed Version: 2013 to the Present
In the spring of 2013, I started losing weight. At first it was kind of cool. I assumed it was just stress and forgetting to eat. Then, without trying, I went from 153 pounds to 93 pounds. Most of the weight loss happened in 3 months. At my age, losing that much weight was scary. I also had other troubling symptoms: fevers, swollen lymph nodes, extreme fatigue, joint pain, fainting, low blood pressure, brain fog, GI issues, breast lumps, itching, and night sweats. During an 18-month period, I had two surgeries, 11 biopsies, two ER visits, multiple invasive tests, and saw over 15 specialists. No one knew what was wrong with me. Guesses ranged from anorexia (um nope, not even close) to Lymphoma to various autoimmune disorders. No one could make a definitive diagnosis, but one caring doctor told me it might be time to get my affairs in order. Scary stuff.
Diagnoses
After multiple incorrect diagnoses, I saw a pediatric geneticist at Vanderbilt on August 18, 2014 (one year ago today and what a year it has been!). Within two hours, I had multiple diagnoses: Ehlers-Danlos Syndrome (EDS) with Dysautonomia, Postural Orthostatic Tachycardia Syndrome (POTS), Gastroparesis, and most likely Mast Cell Activation Syndrome (MCAS). It only took 48 years for a diagnosis!
The primary condition is EDS. It is a rare genetic connective tissue disorder. There is no cure for EDS, you can only treat symptoms. Same thing with POTS and MCAD. For me, the key seems to be avoiding triggers and injuries. My triggers include second-hand smoke, formaldehyde, VOC chemicals, alcohol, stress, and certain foods. Not always easy to avoid triggers. Especially the chemicals and cigarette smoke. For a year, I was essentially a homebound bubble-girl. Then, I quit my job on Halloween and that helped cut down on the stress tremendously.
Avoiding my triggers helped, but I needed more help. I worked on my eating habits. I tried several diets: low histamine, low allergy, Paleo, Specific Carbohydrate Diet (SCD), autoimmune protocol (AIP), Fermentable Oligo-Di-Monosaccharides and Polyol (FODMAP), and Gut and Psychology Syndrome (GAPS). I seemed to stabilize on a modified SCD diet with lots of homemade stock and smoothies, I ate by the legal/illegal list. I quit losing weight, but wasn’t gaining any weight. It got to the point where I was dangerously thin, so I starting eating anything just to gain weight. We called it the Potato Chip-Bacon-Reese’s Cup diet. I do NOT recommend it for anyone. But I was desperate. After almost a year, I gained enough weight to be in the healthy range at around 135 pounds.
The Goats and Hope
After the diagnoses, I went through the typical stages of mourning: denial, anger, bargaining, depression, and acceptance. I was stuck in depression. Being isolated and in constant pain was challenging. To cheer me up, friends sent me animal videos to watch. One of my favorites was of two goat kids in pajamas running around a barn. I fell in love with the baby Nigerian Dwarf goats from Sunflower Farm Creamery in Cumberland, Maine. I watched all the videos from Sunflower Farm, followed their Facebook page, and became hooked on their live barn camera. During kidding season, Sunflower Farm keeps a camera either on the barnyard or in the barn 24/7. I watched it daily. Had it on in the background while working on other things. If I heard something interesting, I’d go watch. I was fortunate to watch Bonnie give birth to her kids. It was amazing to watch it live. I also corresponded a few times with a wonderful woman named Hope. She and her husband Chris, and daughters Lila and Tess run the farm. Before she took the camera down for the season, Hope shared some stories of other goat cam watchers: retired farmers in a nursing home who want to remember what it’s like to be on a farm, the veteran serving overseas who will come home to his family and their adopted goat kid, and so many other sweet stories. Privately, I shared how much the camera had meant to me. How it had brightened my days, and helped motivate me to become healthier and stronger.
I’ve always loved goats, actually all animals. When I was younger, my dad and I bought my mom a pygmy goat for Christmas. Well, Eve got fatter and fatter. It seems we bought a pregnant goat—it was a two-for-one special! She gave birth during an ice storm on Easter Eve to her little Addie (the cutest, but meanest goat ever!). We also had rabbits, guinea pigs, chickens, dogs, and cats and various other animals my mom had in rescue (she was a wildlife rehabilitator). I’d always dreamed about retiring and having a small hobby farm with llamas, goats, etc. Maybe even have a therapy animal to take to hospital patients, nursing homes, schools, etc. After getting sick, I doubted that dream would ever come true. Then I started watching the barn cam and I realized maybe it could happen.
The Pool
During the time I discover the barn cam, our friends left for a three-week vacation and we housesat for them. They had a pool and I started swimming. Exercise is challenging with EDS—some say you gotta move it or you’ll lose it (“Motion is Lotion”). Others say exercise is bad, you’ll injure yourself. I hadn’t found the happy middle-point. I was continually injuring myself on land. Even just picking up my coffee cup, could cause a sprained wrist with torn tendons. Walking was not good, stress fracture in my foot. Recumbent bicycle was good, but boring. In the pool, I can do most anything carefully without injury. The freedom is amazing. And for about 30 minutes to an hour each day, I am virtually pain free. This was unheard of for the past two years! It is an amazing feeling. Our friends came home and they graciously said we could continue using the pool. It has been a blessing.
I swim, walk, jog, do my isometrics, cardio Katie-cise workouts, yoga, meditation, and think about the goats we might one day have. And dream about the farm where we might retire. My workout buddies include birds, squirrels, chipmunks, bunnies, friends, and Matt. The endorphins kick in, my mood improves, and I’m happier that I’ve been in ages. Swimming and daydreaming of a healthy future have helped bring me back to my old self. I’ve gained weight, muscles, strength, balance, and confidence. The difference in a year has been amazing. I am beyond grateful to these wonderful friends, adorable animals, and my online friend Hope.
My Rock
I’ve also been blessed with an amazing husband who has stood by me through all the scary, icky sickness. I know we said, “In sickness and in health, til death do us part” in our wedding vows, but I never expected it to be so literal or so soon. When we checked off a bucket item list—seeing Yo-Yo Ma—we had the pleasure of meeting Mr. Ma and he asked if I had a rock at home. I do! Thank you for your love and support, Matt. Don’t think I’d be here without you.
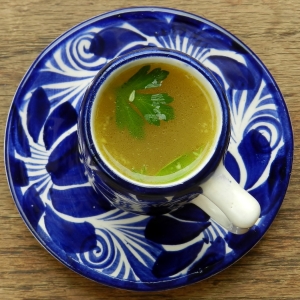
Chicken Stock (A.K.A. Liquid Gold)
One of the foods that helped me the most was a hearty chicken stock. There were days I couldn’t swallow solid food because of the strictures and the pain and this stock was incredibly nourishing. We usually have some in the freezer.
Note: This recipe takes a long time to cook, anywhere from 6 hours to 24 hours. I’ve made it on the stovetop and in a crockpot. I’ve used roasted bones and raw bones. I prefer the taste of the roasted bones, but think the raw bones produce a richer, more gelatinous stock. I’ve also used a mixture of roasted and raw. You can save the bones when you roast a turkey or chicken and freeze them. Then mix them with fresh bones. The choice is yours. This is like most of my “recipes,” measurements are not exact, I wrote something down to give you an idea so you can customize it to your taste. There are many variables, but the bottom line is: if you start with good, healthy, whole ingredients you will probably end up with a good stock. Also, this can be made with beef bones for a hearty beef broth. Or you can use only veggies for a nice vegan broth, won’t need nearly as much cooking (tomatoes are great additions to the beef and vegan broth).
5-6 Pounds chicken bones (I prefer backs, necks, wings, and chicken feet)
1 Tablespoon apple cider vinegar
4-6 Quarts of filtered water (or enough to cover the bones and veggies)
4 Celery stalks, chopped in chunks
4 Carrots, chopped in chunks
4 Small onions, quartered
4 Cloves of garlic, smashed and peeled
1 Teaspoon dried parsley
4 Bay leaves
Sea salt & peppercorns
Handful of fresh parsley (to add at the end)
Turmeric, celery salt, pepper flakes (optional add-ins)
Place the bones and veggies in a large stockpot or a crockpot, add apple cider vinegar, salt, pepper, bay leaves, dried parsley, and cover with water. Bring to a boil. Skim off any foam, if you want (or don’t, all depends on your preference, I don’t mind a cloudy stock). Reduce the heat, cover, and simmer for 6 to 24 hours (it all depends on your schedule and patience). When you are almost finished cooking, taste and adjust the seasoning. Then, add the fresh parsley and cook another 15 minutes.
Then comes the fun part—straining. I usually double strain it back into a large, clean pot. You can use a chinois, mesh strainer, cheesecloth, whatever you prefer. Next critical step is cooling. We keep several ice packs and frozen water bottles in the freezer. I put them in a jumbo clean resalable bag. Then plunge it into the stock for a quick chill. Pour into smaller containers and store in the refrigerator for 3 to 5 days or in the freezer for up to 6 months.
Real Food
Oops, it’s been a few months since my last post. So, what are my excuses this time? The usual—holidays, sickness, family stuff, doggie drama, and work. I had a respiratory infection that lasted over seven weeks. During that time, I didn’t cook very much and when I did, it wasn’t inspired. Some of the results were downright dismal. Definitely not blog worthy. Unless, I wanted to write about my failures, which could be funny. I was beginning to think there was a curse in my kitchen. Maybe it was just my taste buds weren’t working. Thankfully, my taste buds are returning to normal and I’m cooking more.
Sautéed Baby Carrots
This weekend, I made something that was so simple; it was not even recipe worthy. However, it was divine. It all started in our backyard. We were clearing out the winter garden to make room for the early spring garden. I’m not sure if we are supposed to do this now, but the timing seemed right to get the onions in the ground. We’re learning what works for us. In the process of clearing space, we had to sacrifice some carrots. We harvested the prettiest, most tender baby carrots I’ve ever seen. They were an organic rainbow mix – orange, yellow, white, and, purple. Beautiful and delicious.
I trimmed the stems and put them in the compost. Washed the carrots. In a skillet over medium heat, I steamed/sautéed the largest ones first in just a bit of water. Then added the next ones in size. I added the tiniest carrots at the end of cooking; they only had a few seconds on the heat. By this time, the water was gone, so I added a smidge of butter. I then topped them with freshly snipped parsley and a sprinkle of Kosher salt. Within 30 minutes, the carrots went from in the ground to on our table. To me, food doesn’t get much fresher or better.
It sounds silly, but they were so “carroty” tasting that it’s almost indescribable. If your only experience with baby carrots is with those little nubby things in the grocery store, then you are missing a treat. I would highly recommend buying some at a local farmers market or even better yet, growing your own. Carrots are easy to grow. You can even grow them in a deep pot if space is a problem.
Happy eating and happy gardening!
Chocolate Pecan Pie
Matt’s birthday was this past weekend. Since his birthday is around Thanksgiving, pumpkin often figures into his birthday dessert. I’ve made an effort to change it up over the years and have made him a mocha ice cream pie, panna cotta, pecan pie, and bread pudding. Matt is not a huge cake fan, except for carrot cake (maybe next year?!?). This year, we had a few friends over to celebrate Matt’s birthday and to meet our new dog – Katie. Yes, that’s also my name. When you adopt a senior, special needs Aussie you can’t just change her name, so we call her Katie Bug, Katie Jr., Katie Pup (I’m now known as Katie Human to our friends), etc. I hope she can one day join me on a rug in the kitchen while I cook. Right now, she is too scared to venture into the kitchen unless it is a quick visit for a green bean treat. She loves her green beans! I loved that Will kept me company in the kitchen. I didn’t mention it, but we lost him in July. He was almost 15½. He was a wonderful dog and is greatly missed. We are thankful to share our home with another dog. We adopted Katie on November 17th, she is a sweetie and a welcome addition to our family.
I baked Matt one of his favorite desserts for his birthday – a chocolate pecan pie. I made it completely from scratch. Haven’t done that in years. Yes, I cheat sometimes and use store-bought crust (Immaculate Baking Company’s refrigerated pie crust is good and easy). When I say “by scratch,” I mean it: gathered the pecans while walking through our neighborhood, shelled them on the front porch (yes, we live in Alabama!), and made the crust (thank you Ina Garten). Then topped the pie with a little “Matt Man” cutout :). Hope you like it. It’s great for a birthday (or any day!).
Chocolate Pecan Pie (Print recipe)
Crust:
6 tablespoons cold salted butter
2½ tablespoons cold vegetable shortening
1½ cups flour
1½ teaspoon sugar
½ teaspoon salt
3 to 4 tablespoons ice water
Dice the butter. Put the butter and vegetable shortening in the refrigerator while you prepare the dry ingredients. Place the flour, sugar, and salt in the bowl of a food processor fitted with a steel blade. Pulse a few times to mix. Add the butter and shortening. Pulse 8 to 12 times, until the butter is about the size of peas. With the processor pulsing, gradually add the ice water. Pulse until the dough begins to form a ball. Pour dough onto a floured surface and form into a ball. Take care not to overwork it. Wrap in plastic wrap and refrigerate for 30 minutes. Roll into a circle on a floured surface, gently fold, place in a pie dish, and crimp the edges.
Filling:
3 eggs
1 cup white sugar
1 cup corn syrup or golden syrup
1 tablespoon melted butter
1 teaspoon vanilla
¼ salt
2 cups pecans
¼ to ½ cup chocolate chips (depends on how much you like chocolate)
Preheat oven to 350°F.
Lightly beat the eggs. Stir in the sugar, syrup, butter, vanilla, and salt. Mix well. Stir in pecans and chocolate chips. Pour pecan filling into pie crust.
To prevent over-browning, you can cover the crust edges with pie shields or pieces of aluminum foil. Bake on center rack of oven for 60 to 70 minutes (see tips for doneness, below). Remove crust shields after about 45 minutes. Cool for 2-4 hours on a wire rack before serving.
Doneness Hints from the Karo website:
Pie is done when center reaches 200°F. Tap center surface of pie lightly – it should spring back when done.
Variation:
For something different, add ¼ to ½ cup of shredded coconut.
Credits:
The crust is based on a crust recipe from Ina Garten and the pie filling is based on the Karo Syrup recipe.
Pumpkin Bread Pudding
Not sure I’ve posted a recipe without a photo. But I am tonight, because I don’t have time to make the dish and take a photo. Plus, I wanted to get it posted before Thanksgiving. Ok, so there isn’t a lot of time to make this in time for Thanksgiving, but it is quick. And you might be making a pumpkin pie anyway, you could have leftover bread, so you might have all the ingredients already. And maybe you feel like trying something new.
This Pumpkin Bread Pudding is a nice alternative to a traditional pumpkin pie. It combines the best of two worlds–pumpkin pie and bread pudding! It’s not just for Thanksgiving time; you can make it year round. I keep a bag of bread cubes in the freezer. If we have an extra chunk of bread, it goes in the bag. When I get enough, then I make it.
Hope you have a wonderful and safe Thanksgiving. Many thanks to all of you.
Bread Pudding
5 cups stale firm bread “cubes” (crusty French bread, cinnamon swirl bread, etc.)
3 tablespoons melted butter
1⅓ cups sugar
3 large eggs
2 cups half-and-half (or 1 cup milk and 1 cup cream
15 ounces pumpkin purée (canned pumpkin is fine)
¼ teaspoon salt
1 teaspoon cinnamon
¼ teaspoon cloves
¼ teaspoon ginger
¼ teaspoon nutmeg, freshly grated
½ teaspoon vanilla
½ cup golden raisins (or dried cranberries)
½ cup chopped pecans (or walnuts)
Optional toppings: whipped cream, warm dulce de leche or caramel sauce, whiskey sauce, and/or a sprinkle of pecans.
Preheat the oven to 350°. Melt the butter in an 11×17 baking dish. Swirl it around to coat the bottom and sides. This is a lot of butter, but you will later pour the excess into the pumpkin mixture. Tear or cut the bread into medium pieces and place in a large mixing bowl. Sprinkle the bread with ⅓ cup of sugar, toss it around, and let it sit while you prepare the pumpkin mixture.
In a separate bowl, lightly beat the eggs. Add 1 cup sugar, half-and-half, pumpkin, excess butter, salt, spices, and vanilla. Mix well. Pour the pumpkin mixture over the bread and stir. Place half in the baking dish, sprinkle with raisins and pecans. Top with remaining mixture. Top with the other half of the mixture. Bake for 25-35 minutes or until firm and lightly brown. Serve warm with one of the toppings or enjoy it plain!
Spicy Lentil and Kale Soup
It is certainly closer to soup season in North Alabama. We’ve had some freezing temperatures, just enough to make us bring in the giant Ficus and harvest our sweet potatoes. But then this weekend, it was in the upper 70s. Interesting weather so far! Regardless of the weather, this is a great soup. It doesn’t need a long time to cook, but the flavor improves as it cooks. It is similar to my Egyptian Style Red Lentil Soup but this has kale. Actually you could use most any variety of greens – you just might need to make a few adjustments. If you using a quick-cooking cooking green like cabbage or bok choy, just put it in later. You could also use collards, broccoli rabe, or even mustard greens. I haven’t tried this, but a sweet potato (freshly harvested from the Smith-Jordan garden) would probably be good in place of the regular potato. Play around with the spices, add some cinnamon or allspice if you want to mix it up even more. Use water or veggie broth. Have fun with this recipe and enjoy…
Spicy Lentil and Kale Soup (Print recipe)
3 tablespoon extra-virgin olive oil
1 medium onion, chopped
3 stalks celery, chopped
2 medium carrots, peeled and chopped
1 large potato, diced in small cubes
3 cloves garlic, chopped
1½ teaspoons freshly ground cumin
½ teaspoon turmeric
1 tablespoon fresh rosemary, chopped
1 teaspoon Aleppo pepper (or a hefty pinch of cayenne pepper or red pepper flakes)
1 teaspoon salt
½ teaspoon freshly ground black pepper
pinch of freshly grated nutmeg
3 tablespoons tomato paste
2 cups red lentils
4 cups veggie broth*
2 cups water (might need more)
1 bunch kale, stems removed, chopped
Optional Garnish: Kale Chips
In a large heavy pot or Dutch oven, heat the olive oil and add the onions, celery, carrots, and potato. Cook for about 5 minutes. Add the garlic, cumin, turmeric, rosemary, Aleppo pepper, salt, black pepper, and nutmeg. Cook another 10 minutes. Stir in the tomato paste. Add lentils. Stir in the veggie stock and water. Add the kale. Bring to a simmer, stirring frequently. Reduce heat, cover, and simmer on low until the lentils are cooked, about 45 minutes. Garnish with crispy kale chips and serve.
*You can use 4 cups of veggie broth and 2 cups of water or you can use 6 cups of water. The veggie broth adds more flavor, but it is also delicious with only water. If you want a thicker soup, you can use less liquid. Depending on your lentils, you might need to increase the liquid if it is too thick.
Lemon Ginger Honey
With the cooler temperatures of October, I am more inclined to drink hot tea. I enjoy hot tea with milk and sugar but that’s not the healthiest way for me to drink it (especially with my dairy and sugar sensitivities). Usually I drink it plain or with honey and lemon, unless it is spicy chai. With chai, I prefer coconut milk.
We had half a jar of local honey that crystallized so I made lemon ginger honey. I heated the honey, added fresh lemon slices (no seeds) and chunks of fresh ginger. So far, it has been in the refrigerator for about a month. The fruits are softer and the honey tastes more “flavored” as it has aged. I tried it in hot tea and by itself when I had a cold. It is nice and soothing to a scratchy throat! The ginger chunks are delicious; they taste like candy. If you are inclined, you can even eat the lemons (rinds and all). It reminds me a bit of orange marmalade combined with lemon curd. Guess that would be lemon marmalade :)
Lemon Ginger Honey
12 ounces of honey in a 24-ounce glass jar
2 large lemons, sliced*
1 large piece of ginger, sliced or cut into chunks
Heat the honey until it is warm. You can do this in the microwave or you can place the glass jar in a pan with very hot water. Warming the honey is particularly useful if the honey is crystallized. It also helps the honey meld with the lemon and ginger. Place the fruit in the jar, alternating lemon slices with the ginger. Push down with a spoon as needed. You want the mixture packed in the jar. Store in the refrigerator for at least three days before using, this gives the flavors a chance to blend. Then enjoy it!
*Wash and dry the lemons. Cut the lemon lengthwise. Place the flat side on the cutting board and cut thin, half-moon slices. Remove any seeds.
Frittata
Recently a fellow blogger, posted about writer’s block. Mike (at Made by Mike) was suffering from it and I know that feeling all too well. I haven’t posted in over a week and wondered if maybe that was my issue too. But I don’t think so. I’ll chalk it up to not feeling well the last week or so. Caught a cold at my nephew’s wedding (it was worth it) and I am suffering with fall allergies. Spending time clearing the summer garden and working on the fall garden does not help my allergies but it helps keep me sane.
Combine puniness with learning new software at work and it’s no wonder I’m not cooking, blogging, and taking food photos! So, with little fodder for the blog, I turn to my husband, Matt, for this recipe – Kitchen Sink Frittata. It’s his latest creation. I’ve slowly corrupted Matt. When we first met, he was a recipe follower, but not so much these days. He got the inspiration for the frittata from one of his favorite cookbooks, The All New Good Housekeeping Cook Book. However, we had leftovers so he used them instead of following the recipe. He cleaned out the refrigerator and used leftover creamed spinach, the Cutest Potatoes Ever, and the Layered Summer Vegetable Bake. It was delicious. Have I mentioned lately that I love having a husband who enjoys cooking?!? I am allergic to eggs (and sensitive to dairy), but I ate some anyway, it was totally worth the rash and itching. Typical medical disclaimer: if you are allergic to any of the ingredients please do not risk it by trying this recipe! I have dealt with food allergies for so long, I know my limits. Disclaimer over, and now back to the recipe…
Frittata (Print recipe)
8 eggs
1½ teaspoon salt
1 teaspoon pepper
¼ cup half-and-half
¼ cup water
3 tablespoons fresh herbs (parsley, oregano, Greek basil, thyme), roughly chopped
2 cups potatoes (I would do more), thinly sliced
2 cups roasted veggies, chopped and/or thinly sliced (tomatoes, onions, peppers, artichokes, eggplant, summer squash, mushrooms, zucchini, garlic, etc.)
3 tablespoons olive oil
1 cup creamed spinach (or other greens, add cream cheese and/or more cheese if just using regular spinach)
1 cup grated cheese*
 Preheat oven to 425º F. In a large bowl, combine eggs, water, half and half, salt, and pepper. Beat until combined. Add herbs and half of the cheese, beat some more.
Note: this step assumes you are using up leftovers and everything is cooked. In a large oven safe skillet, heat olive oil over medium heat. Make sure you have some oil on the sides of the pan to prevent sticking. Reheat ingredients according to their thickness and ability to handle heat – heat the potatoes first, then the veggies, and then the spinach. As soon as everything is warm and reasonably well combined, add egg mixture. Stir slightly so that ingredients are evenly distributed, then let it cook for 3 to 4 minutes or until it starts to set on the edges. Pop it in the preheated oven.
Cook for 8 minutes. Remove from oven and top with the remaining cheese. Pop it back in the oven until cheese melts (about 2 to 4 more minutes).
To serve, loosen frittata from skillet by easing it up around the edges. Use a good metal spatula to loosen the bottom, and then gently slide it onto a platter. Makes: 6-8 servings.
*You can use cheddar, Swiss, Parmesan, or another cheese of your choice. You can also use more if you prefer. You really can’t have too much cheese with the amount of eggs in this frittata.
Cutest Potatoes Ever
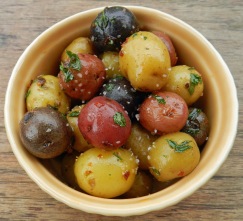
Usually, my food isn’t very pretty. I spend more time concerned with the taste than the looks. Wish I could do both, but I can’t. However, with these little potatoes, anyone can make “cute” and delicious food. To give you an idea of how tiny they are, the potatoes in the photo are in a 3-inch ramekin!
If you’ve been reading The Flaming Pot Holder lately, you know we like to grow our food when possible. Farmers markets are a great second choice for purchasing local food. However, sometimes you see something at a grocery store you must try. That happened a few weeks ago at the Whole Foods Market in Nashville. We found marble-sized red, white, and purple potatoes.
The company is Tasteful Selections and the Sunrise Medley Nibbles potatoes are from their Simply Amazing Potatoes line of products. They are tiny, but very flavorful and tender. When I emailed the company to ask permission to include them in the blog, I received a nice response from Melissa in their marketing department. I mentioned recently that I wanted to add a few reviews to the blog, so guess this is my first official one! I like the fact that this is still a family owned farm; it makes me feel better shopping at a big box store. If you want to give them a try, you should check out their website and Facebook page for other recipes, coupons, and even a sweepstakes. They also have a store locator so you can find where to buy them in your area.
To keep it vegan, you can use olive oil, coconut oil, margarine or your favorite oil. You just want something to help the salt, pepper, and herbs adhere. From start to finish, I think it only took about 10 minutes, so this really is a fast side dish. Hope you like these delicious and cute potatoes!
Cutest Potatoes Ever (Print recipe)
1 bag Sunrise Medley Nibbles potatoes (or other tiny potatoes)
1 teaspoon salt
1 tablespoon olive oil (margarine, oil of your choice, or butter)
Kosher salt, to taste
Pepper (I used ground black pepper and Aleppo pepper flakes)
Fresh chives and/or herbs, chopped (I used parsley and Greek basil)
Wash the potatoes. Put the potatoes in a large saucepan, add one teaspoon of salt, and enough water to cover the potatoes. Cover and bring to a boil. Reduce heat to medium-low and simmer for 5 minutes. Test a potato, by piercing with a fork. Depending on the size, they might be done. Otherwise, they might need a few more minutes. Cook until tender. Drain. Add olive oil. Season with salt and pepper to taste. Sprinkle with fresh herbs. Enjoy! These are even delicious the next day cold! You can toss them into a salad.
Coming soon…my husband’s recipe for a Kitchen Sink Frittata that uses leftover potatoes as one of the ingredients!
Layered Summer Vegetable Bake
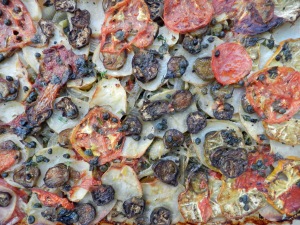
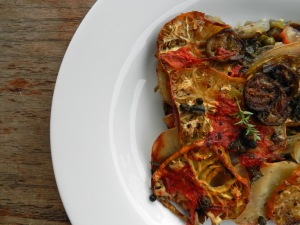
The other morning on the TODAY Show, Martha Stewart had a recipe for a Provençal Vegetable Tian. It sounded and looked delicious. But of course I did not have all the ingredients she used. So, I decided to make my own version with things from our pantry, our garden, and our friend’s garden. That seems to be a theme lately – use what you have.
Back in high school, I was on the yearbook committee and one of my least favorite tasks was writing titles and captions. Not much has changed. I still struggle with this, in technical writing and in recipe writing. Not sure what to call my version of Martha’s recipe. Strata is not completely accurate since it doesn’t contain eggs, bread, or cheese. It reminded me of a baked late summer vegetable layered ratatouille. However, I didn’t cook the vegetables separately. It could be called a casserole, but it seems a little too fancy for that (not that there’s anything wrong with a casserole). I guess it really is a tian, a layered casserole of French origin. But, I hate to totally copy Martha, thus the lame name: Layered Summer Vegetable Bake. At least it is descriptive. Oh well, whatever you call it, hope you enjoy my version.
My typical disclaimer: This is another recipe where you can customize it to your tastes or use what is fresh and available. If you do not like eggplant, you can use zucchini, zephyr, crookneck, or patty pan squash. If you want to add peppers, go for it! Add more garlic if you’d like. If you do not have fresh herbs, dry herbs can be used. If you are on a sodium-restricted diet, you can omit or decrease the amount of salt. If you want to mix it up, you could even add sweet potatoes. Feel free to use different oil, if you prefer. Basically, you are layering veggies with a bit of salt, pepper, oil, and herbs, squishing it, and baking it. Ok you get it, please make this YOUR dish and have fun!
Layered Summer Vegetable Bake (Print recipe)
4 tablespoons extra-virgin olive oil, divided
4 garlic cloves, sliced ⅛ inch thick
1 medium onion, sliced ⅛ inch thick half-moons
1 leek or green onion, sliced ⅛ inch thick
4 small potatoes, sliced ⅛ inch thick
1½ teaspoons coarse salt
¾ teaspoon freshly ground pepper
4 medium eggplants, sliced ⅛ inch thick (I used skinny green, purple, and a few round orange Turkish eggplants)
4 medium tomatoes, sliced ⅛ inch thick
4 tablespoons capers, whole or smashed/chopped
4 teaspoons fresh herbs (thyme, parsley, and basil), chopped
Garnish: Fresh Herbs
Serves: 4-8 (depends on whether it is a main dish or a side dish)
Wash, dry, and slice your veggies. Preheat oven to 450 degrees. Drizzle 1 tablespoon oil into 13x9x2” baking dish*. Cover the bottom with half the garlic, onions, and leeks. Top with half the potatoes. Sprinkle with ½ teaspoon salt and ¼ teaspoon pepper. Top with half the eggplant. Top with half the tomatoes. Sprinkle with ½ teaspoon salt and ¼ teaspoon pepper. Cover with half the capers and half the fresh chopped herbs. Drizzle with 1 tablespoon oil. Use an oiled spatula to press down the vegetables. Repeat the layers – garlic, onions, leeks, potatoes, salt pepper, eggplant, tomatoes, ½ teaspoon salt and ¼ teaspoon pepper, capers, herbs, 2 tablespoons oil. Use an oiled spatula to press down the vegetables. Cover loosely with foil. Bake for 20 minutes. Remove the foil. Use an oiled spatula to press down the vegetables. Bake until the top is golden and caramelized, about 45 minutes more. Let sit at room temperature for 10 minutes before slicing.
*If you have lots of patience, you could make individual serving sizes using either a muffin pan or mini ramekins. As you can probably tell from my photo, my version was very thin. That’s because we like crispy bits (there were lots). If you want less crisp and more layers, feel free to use a smaller baking dish.
Eye of the Goat Bean Soup
If you made the eye of goat beans and rice from the last post, there is a good chance you had leftover beans (unless you cooked for a crowd). So what do you do with them? You can freeze them, make bean salad, chili, or refried beans. Or you could make a simple, quick soup. That’s what I did! I’ve recently started back to work at a real job, as a technical writer and editor. After two years of not working, I’m relearning my time management skills. Juggling work, gardening, cooking, food writing, yard work, housework, etc. is challenging. Anything that makes a quick and healthy meal is a good thing in my book.
I served the soup topped with a bit of grated cheese, a few splashes of hot sauce, and some chopped fresh herbs. We had just bought some Cumin Gouda from the Franklin Farmers Market in Nashville and I thought it would be good with the soup. It was! The cheese is from Kenny’s Farmhouse Cheese in Austin, Kentucky. If you happen to see them at a market near you, I would highly recommend them (or you can order online). They have some unique flavors: Cranberry Havarti, Coffee Cheddar, Garlic Paprika Monterey Jack, etc. I also served the soup with Beanitos’ Black Bean Chips, a new chip we recently discovered. I have several food allergies/food sensitivities and avoid corn, but sometimes I want a corn chip. Well, these are a good substitute – no corn or gluten; but high in protein thanks to the black beans!
Eye of the Goat Bean Soup
Leftover eye of the goat beans (we had half the batch leftover)
Veggie stock or water
Salt
Pepper
Garnishes: grated cheese, sour cream, yogurt, hot pepper sauce, fresh herbs, chopped peppers, sliced green onions, crackers, chips, etc.
Special equipment: immersion blender, food processor, blender, or potato masher
Depending on how soupy you made the beans, you might need to remove some of the liquid and reserve it for later (just in case you need it). Heat the beans over low heat. Mash the beans, either by hand or use an immersion blender, food processor, or a regular blender. If needed, add the extra bean liquid, stock, or water to make a nice soup consistency. Make sure it is heated through and season with salt and pepper as needed. Top with garnishes and serve.


